Windows tip: Mounting Partitions to Directories
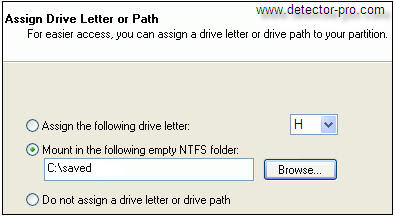
By definition – to mount is to make a group of files in a file system structure accessible to a user or user group. In some usages, it means to make a device physically accessible. In this particular post I will explain you how to mount partitions of directories. This is another neat trick you might not have known that you can do in Windows. You can use this thick for example (my case): You have folder (c:/saved) where you storage downloaded files and you like to link that folder with another disc with bigger capacity (H:), but the path remain the same.
 To mount disk partitions as folders right click on ‘my computer’ and select ‘properties’ then ‘manage.’ Open ‘disk management’ from the computer management window. Right click on the partition you wish to mount as a directory in the graphical partition window (lower pane) and select ‘change drive letter and paths.’
Remove the current option (if any), then click add. Choose the ‘mount in the following empty NTFS folder,’ browse to the desired volume and add a directory for your drive. Click ‘ok.’
Finish. If you like to return things back to the way they were, repeat the procedure, removing the directory location and choosing a drive letter instead.
The data on the drive will be unharmed.
Tags | Howto, Storage, Tips and Tricks, Tutorials, Windows


